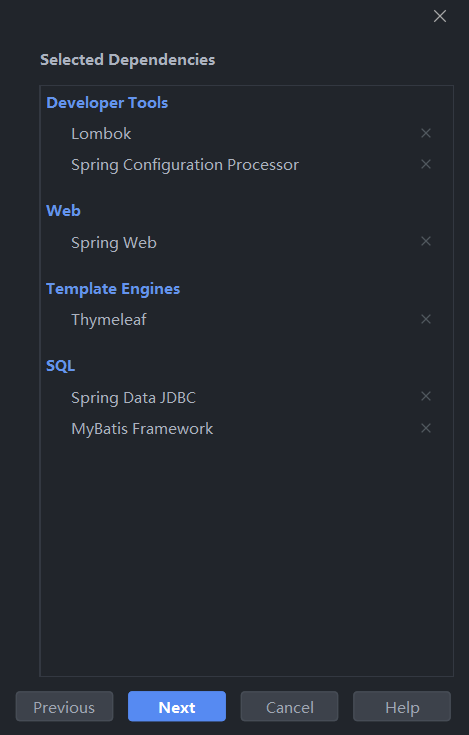
创建 Spring Boot 项目 利用 IDEA 内置的 Spring Initializr 创建项目,根据需要选择相应的模块,这里已经内置了 MyBatis Framework 选项。
当然你也可以选择手动引入:
1 2 3 4 5 6 <dependency > <groupId > org.mybatis.spring.boot</groupId > <artifactId > mybatis-spring-boot-starter</artifactId > <version > 2.1.4</version > </dependency >
另外不要忘了引入数据库驱动的依赖。
项目 pom.xml 如下:
1
2
3
4
5
6
7
8
9
10
11
12
13
14
15
16
17
18
19
20
21
22
23
24
25
26
27
28
29
30
31
32
33
34
35
36
37
38
39
40
41
42
43
44
45
46
47
48
49
50
51
52
53
54
55
56
57
58
59
60
61
62
63
64
65
66
67
68
69
70
71
72
73
74
75
76
77
78
79
80
81
82
83
84
85
86
87
88
89
90
91
92
93
94
<?xml version="1.0" encoding="UTF-8" ?> <project xmlns ="http://maven.apache.org/POM/4.0.0" xmlns:xsi ="http://www.w3.org/2001/XMLSchema-instance" xsi:schemaLocation ="http://maven.apache.org/POM/4.0.0 https://maven.apache.org/xsd/maven-4.0.0.xsd" > <modelVersion > 4.0.0</modelVersion > <parent > <groupId > org.springframework.boot</groupId > <artifactId > spring-boot-starter-parent</artifactId > <version > 2.3.7.RELEASE</version > <relativePath /> </parent > <groupId > com.yin</groupId > <artifactId > boot-07-mybatis</artifactId > <version > 0.0.1-SNAPSHOT</version > <name > boot-07-mybatis</name > <description > Spring Boot 整合 MyBatis</description > <properties > <java.version > 11</java.version > <mysql.version > 8.0.19</mysql.version > </properties > <dependencies > <dependency > <groupId > org.springframework.boot</groupId > <artifactId > spring-boot-starter-data-jdbc</artifactId > </dependency > <dependency > <groupId > org.springframework.boot</groupId > <artifactId > spring-boot-starter-thymeleaf</artifactId > </dependency > <dependency > <groupId > org.springframework.boot</groupId > <artifactId > spring-boot-starter-web</artifactId > </dependency > <dependency > <groupId > org.mybatis.spring.boot</groupId > <artifactId > mybatis-spring-boot-starter</artifactId > <version > 2.1.4</version > </dependency > <dependency > <groupId > mysql</groupId > <artifactId > mysql-connector-java</artifactId > <version > ${mysql.version}</version > </dependency > <dependency > <groupId > org.springframework.boot</groupId > <artifactId > spring-boot-configuration-processor</artifactId > <optional > true</optional > </dependency > <dependency > <groupId > org.projectlombok</groupId > <artifactId > lombok</artifactId > <optional > true</optional > </dependency > <dependency > <groupId > org.springframework.boot</groupId > <artifactId > spring-boot-starter-test</artifactId > <scope > test</scope > <exclusions > <exclusion > <groupId > org.junit.vintage</groupId > <artifactId > junit-vintage-engine</artifactId > </exclusion > </exclusions > </dependency > </dependencies > <build > <plugins > <plugin > <groupId > org.springframework.boot</groupId > <artifactId > spring-boot-maven-plugin</artifactId > <configuration > <excludes > <exclude > <groupId > org.springframework.boot</groupId > <artifactId > spring-boot-configuration-processor </artifactId > </exclude > <exclude > <groupId > org.projectlombok</groupId > <artifactId > lombok</artifactId > </exclude > </excludes > </configuration > </plugin > </plugins > </build > </project >
在 application.yml 中进行相关属性的配置:
1
2
3
4
5
6
7
8
9
10
11
12
13
14
spring: datasource: driver-class-name: com.mysql.cj.jdbc.Driver url: jdbc:mysql://localhost:3306/jdbc_template?serverTimezone=Asia/Shanghai username: root password: 123456 mybatis: configuration: map-underscore-to-camel-case: true mapper-locations: classpath:mapper/*.xml
spring.datasource 配置的是数据库的相关属性。
关于 MyBatis 的设置,这里是在 mybatis.configuration 配置的。当然也可以编写 MyBatis 的 xml 全局配置文件,并用mybatis.config-location 指定其位置,两者二选一。
创建数据库表 1 2 3 4 5 6 7 CREATE TABLE city( `id` INT (11 ) PRIMARY KEY AUTO_INCREMENT, `name` VARCHAR (30 ), `state` VARCHAR (30 ), `country` VARCHAR (30 ) );
对应实体类:
1 2 3 4 5 6 7 @Data public class City { private Long id; private String name; private String state; private String country; }
编写 mapper 接口 这里以查询和插入方法为例。在方法上直接标注相应的注解,然后编写 SQL 语句即可,非常简单方便。
不要忘记在类上标注 @Mapper 注解 ,表明这是一个 mapper 接口。
1 2 3 4 5 6 7 8 9 10 11 12 13 14 15 16 17 18 19 20 21 22 23 24 25 @Mapper @Repository public interface CityMapper { @Select("select id, name, state, country from city where id=#{id}") City getCityById (Long id) ; @Insert("insert into city(name, state, country) values(#{name},#{name},#{name})") @Options(useGeneratedKeys = true, keyProperty = "id") void insert (City city) ; }
在方法注解上编写 SQL 语句适合比较简单的情况,如果遇到复杂 SQL,还是在 xml 文件中编写更好。以上面的 insert 方法为例,xml 中是这样的:
1
2
3
4
5
6
7
8
9
10
<?xml version="1.0" encoding="UTF-8" ?> <!DOCTYPE mapper PUBLIC "-//mybatis.org//DTD Mapper 3.0//EN" "http://mybatis.org/dtd/mybatis-3-mapper.dtd" > <mapper namespace ="com.yin.mybatis.mapper.CityMapper" > <insert id ="insert" useGeneratedKeys ="true" keyProperty ="id" > insert into city(name, state, country) values(#{name},#{name},#{name}) </insert > </mapper >
更复杂的 SQL 等的编写属于 MyBatis 的内容,不再赘述。
测试 经过上述操作,已经整合完成了,几乎没有编写烦人的 xml 文件。下面就可以对其进行测试了。
首先编写 service:
1
2
3
4
5
6
7
8
9
10
11
12
13
@Service public class CityService { @Autowired CityMapper cityMapper; public City getCityById (Long id) { return cityMapper.getCityById(id); } public void insert (City city) { cityMapper.insert(city); } }
再编写 controller:
1
2
3
4
5
6
7
8
9
10
11
12
13
14
15
16
17
18
@Controller public class MybatisController { @Autowired CityService cityService; @ResponseBody @GetMapping("/city") public City getCityById (@RequestParam("id") Long id) { return cityService.getCityById(id); } @ResponseBody @PostMapping("/city") public City insertCity (City city) { cityService.insert(city); return city; } }
测试工具使用 Postman。
测试前先看一下项目结构:
小鸟的图标是 IDE 插件 MyBatisX。
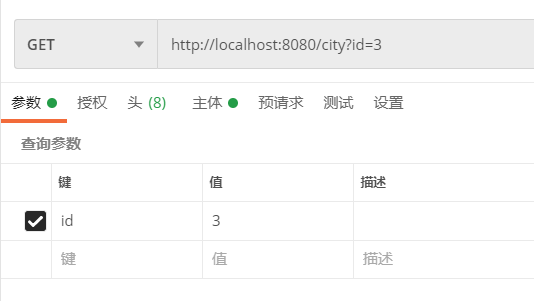
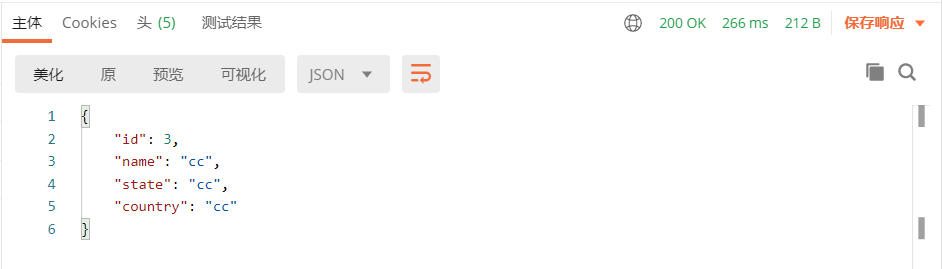
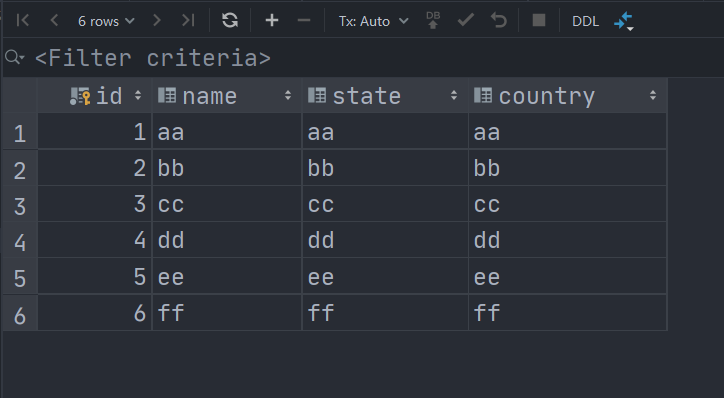
首先测试 getCityById 方法:
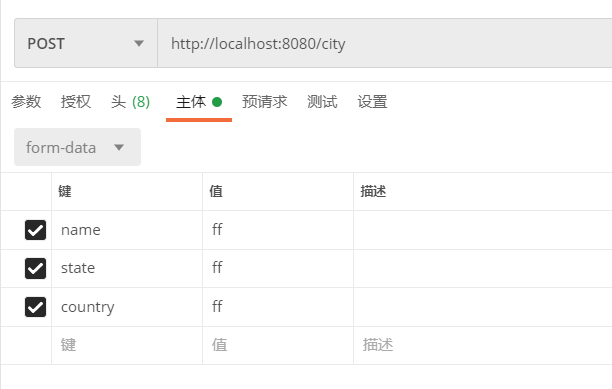
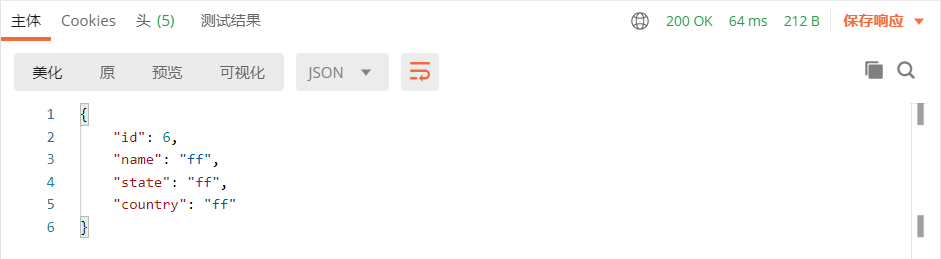
再来测试 insert 方法:
更多内容可参阅 MyBatis 官方资料:MyBatis integration with Spring Boot
本文代码已上传至:https://gitee.com/ME_WE/spring-boot-practice